|
|
本帖最后由 834405595 于 2022-4-6 01:21 编辑

这是一篇学习笔记
目前是demo版本,质量一般,在完成后会发布数据集以及pkl文件,需要的可以回复一下,等完成了会通知你。
搓这玩意我是团也打不好觉也睡不好啊,40个小时训练了150g的模型出来
本次实验数据来源于pixiv,需要自行出国留学。
在线安装PixivBatchDownloader。本次实验采用chrome作为示例。
1.打开github页面后在下方找到在线安装,点击Chrome Web Store安装
2.安装完成后打开pixiv,可以看见右上角多了个小蓝标
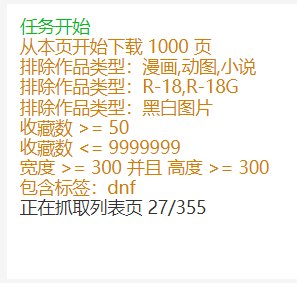
3.在搜索栏搜索你想要的标签,本次以dnf为例,在搜索栏输入DNF后回车。
4.点击小蓝标,点击显示高级设置,会出现如下图的界面。
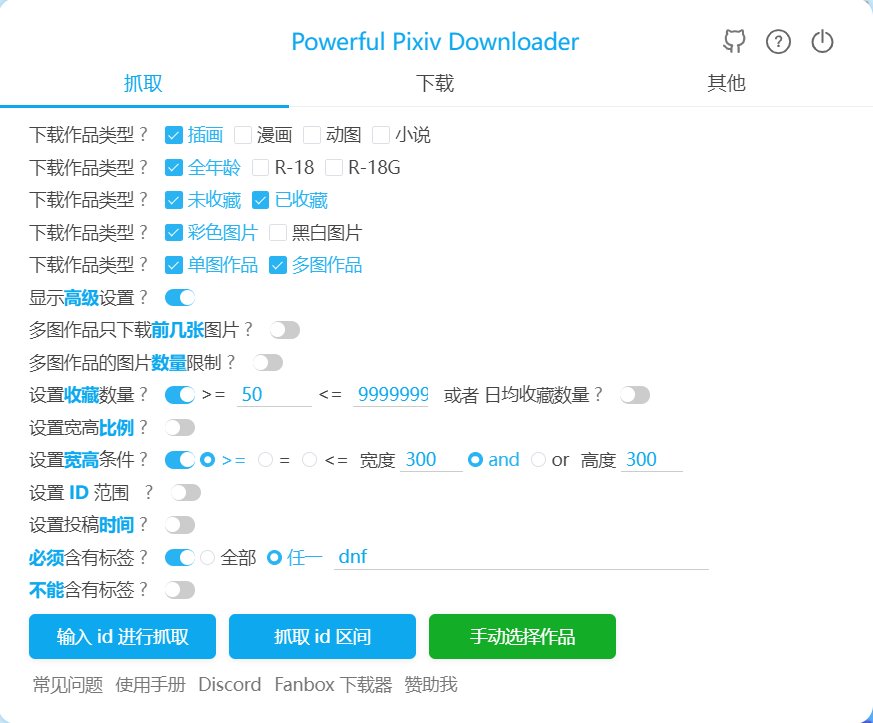
5.按个人需求设置好后点击开始抓取。
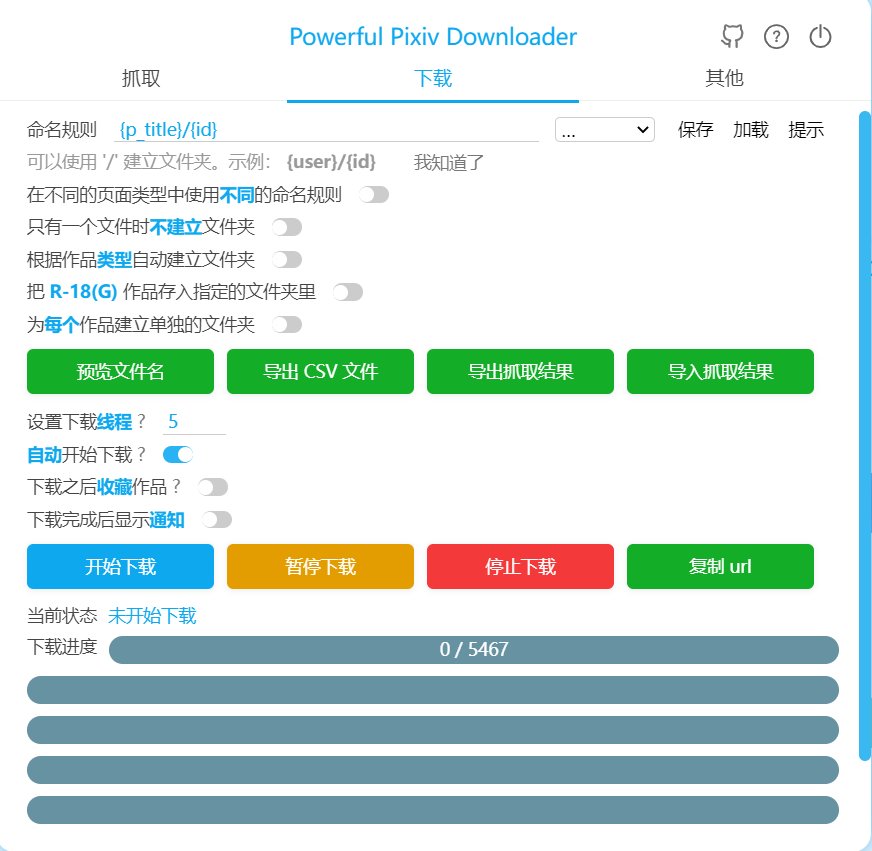
6.抓取完成后在下载页面点击开始下载
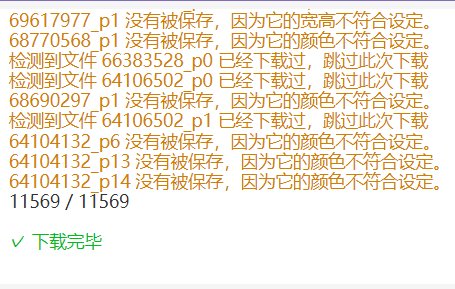
7.在足够稳定的网络条件下即可完成下载。
8.如果你不想进行数据预处理操作,请自行直接在图像上截图,尺寸必须为512*512,保存为png格式然后跳转至获取模型步骤。当然你想训256*256的也可以自行调config,从头训或者拿官方的ffhq做迁移学习。
略
爬虫获取的图片肯定会有你不喜欢的图,以及混进各种奇怪的东西,所以需要对数据进行第一次人工筛选。
1.打开存放图片的文件夹后在空白处单机右键->查看->超大图标,便于直接筛选。
2.在你喜欢的位置新建一个文件夹,改名为origin,将你需要使用的图片从爬取的图片中单独拎出来。
3.不建议混合使用手绘,黑白图像,单色图像,线稿,RGB图像,如有需要请单独训练,本次仅选择RGB图像。
4.完成第一次数据清洗。
lbpcascade_animeface的github页面见附录,这里跳过从github克隆仓库的过程直接上手。
1.在你喜欢的地方新建一个txt,打开在里面输入以下代码,保存,重命名为crop.py。需要提前开启文件后缀。
缺啥包比如opencv自己pip install opencv-python,需要安装到系统python环境而不是某些虚拟环境。
import cv2
import sys
import os.path
def f2f(cascade_file, origin_dir, face_dir):
if not os.path.isfile(cascade_file):
raise RuntimeError("%s: not found" % cascade_file)
cascade = cv2.CascadeClassifier(cascade_file)
image_names = [files for root, dirs, files in os.walk(origin_dir)][0]
print('find %s files in %s' % (len(image_names), origin_dir))
for index, image_name in enumerate(image_names):
image_path = os.path.join(origin_dir, image_name)
image = cv2.imread(image_path)
if image is None:
print('error read image: %s\n' % image_name)
continue
gray = cv2.cvtColor(image, cv2.COLOR_BGR2GRAY)
gray = cv2.equalizeHist(gray)
faces = cascade.detectMultiScale(gray,
# detector options
scaleFactor=1.1,
minNeighbors=5,
minSize=(50, 50))
i = 0
for (x, y, w, h) in faces:
# cropped = image[y: y + h, x: x + w] # origin
# cropped = image[int(y * 0.25): y + h, int(x * 0.90): x + int(w * 1.25)] # gwern
top = max(y - int(h * 0.5), 0)
left = max(x - int(w * 0.25), 0)
cropped = image[top: top + int(h * 1.5), left: left + int(w * 1.5)] # math
cv2.imwrite(os.path.join(face_dir, "%s_%s.png" % (image_name, str(i))), cropped)
i += 1
print("\r", "%s/%s " % (index, len(image_names)), end="", flush=True)
print('Done!')
if len(sys.argv) != 4:
sys.stderr.write("usage: crop.py <animeface.xml file> <input folder> <output folder>\n")
sys.exit(-1)
f2f(sys.argv[1], sys.argv[2], sys.argv[3])
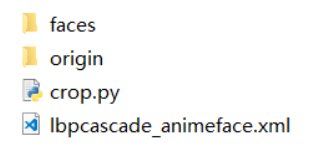
2.下载 lbpcascade_animeface.xml,将crop.py和xml至于同一个新建文件夹下
3.在文件夹内新建一个文件夹改名faces,将清洗后图像移入文件夹,最终格式如下。
4.打开cmd输入cd /d 你存放这个文件夹的路径,例如(cd /d E:\lbpcascade_animeface\examples)
5.输入python crop.py lbpcascade_animeface.xml ./origin ./faces
6.等待裁剪完成
1.受限于lbpcascade_animeface的性能,部分图片无法准确识别出人脸区域,需要手动删除这些图片。
2.部分图片无法识别出人脸,如果特别喜欢这张图可以自行截图放入faces文件夹,尽量接近正方形或为正方形,否则插值resize后会变形。
略
1.下载waifu2x-caffe
2.打开waifu2x-caffe.exe
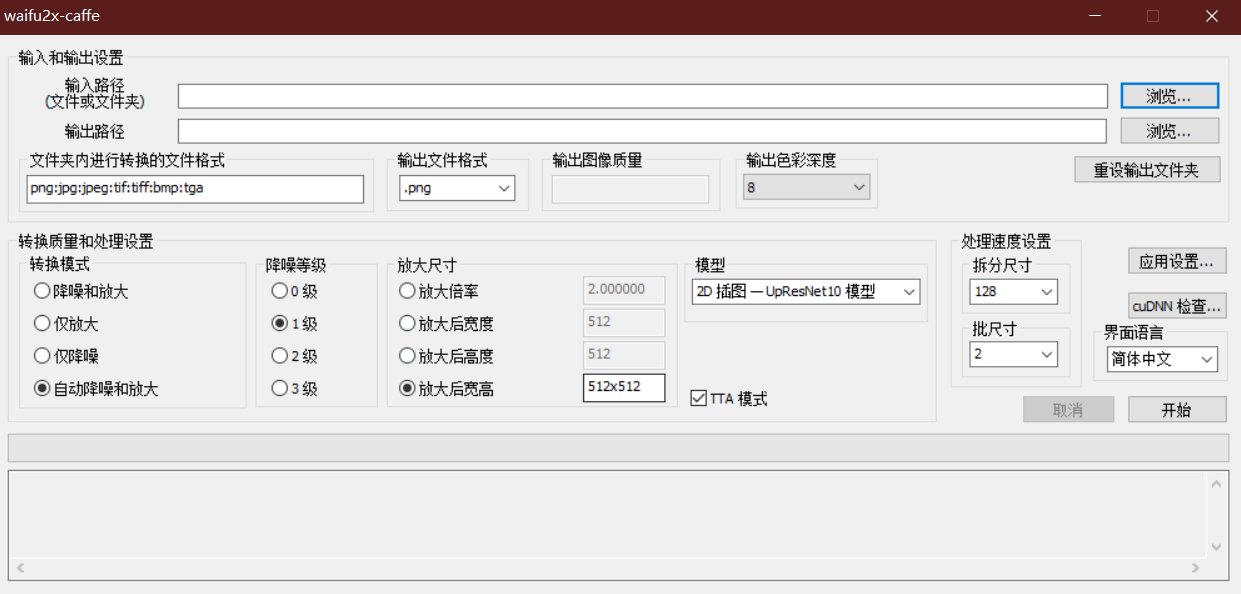
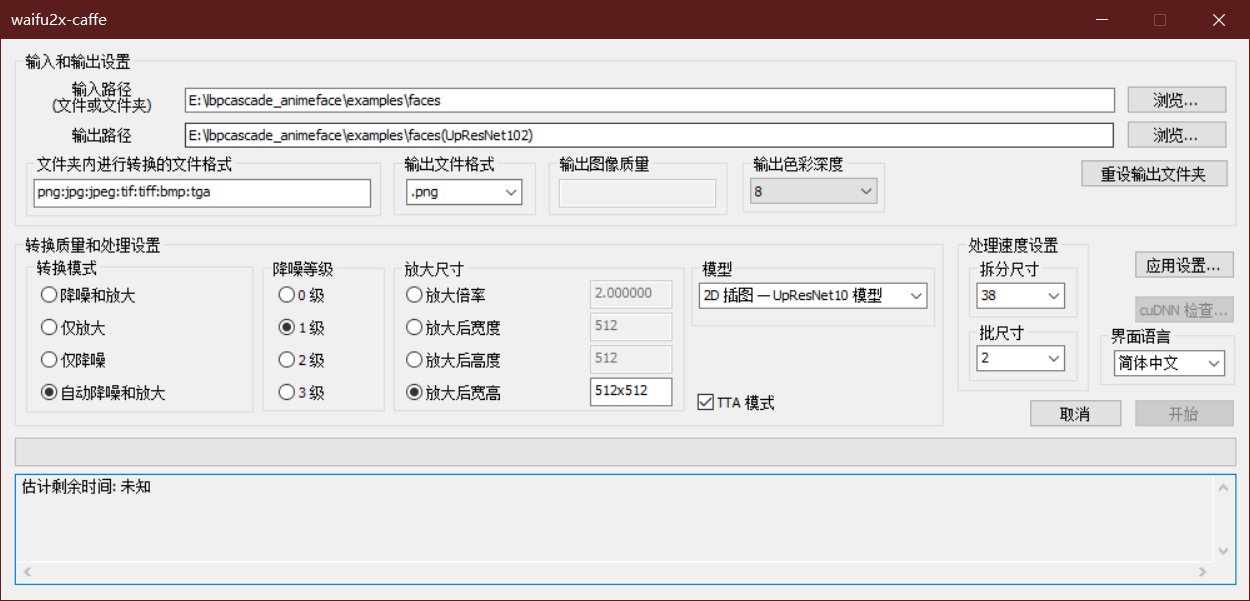
3.输入路径处选择faces文件夹
4.转换模式、降噪等级根据个人需求选择,降噪等级越高,模糊图像放大后越平滑,细节丢失越多。放大尺寸为512x512,模型upresnet、CUnet都行。拆分尺寸和批尺寸根据个人显存大小选择,拆分尺寸越小,batchsize越小,显存消耗越小,速度越慢,时间换空间。TTA开启后所需时间多8倍,信噪比提升,实际提升有限,看个人设备选择是否开启。
5.点击开始,cpu党可以去睡一觉,等待完成。
如果跑不动请检查是否有图像大于5000*5000
1.手动浏览一遍输出图像,删除这些模糊图片即可。
2.顺便删除一些自己不希望喂入网络训练的图片。
3.ctrl+A选中所有图片,重命名。
这时候所有图像会自带例如mage(100)后缀,我们需要去除括号。
新建一个文本文档,输入以下代码,保存,后缀改为bat,双击运行
@Echo Off&SetLocal ENABLEDELAYEDEXPANSION
FOR %%a in (*) do (
set "name=%%a"
set "name=!name: (=!"
set "name=!name:)=!"
ren "%%a" "!name!"
)
exit
4.因为保存的图像为png,png图像存在alpha通道(透明通道),直接输入网络训练会报错,所以需要去除图像alpha通道。
在存放图像的文件夹内新建文本文档,输入以下代码,保存,改名removealpha.py。
打开cmd,cd到你的文件夹目录下,输入python removealpha.py,成功后即可去除alpha通道
import os
from PIL import Image
# Absolute path to this script
scriptdir = os.path.dirname(os.path.abspath(__file__))
# Walk through directory
for root, subfolders, files in os.walk(scriptdir):
for file in files:
try:
image = Image.open(os.path.join(scriptdir, root, file))
# If image has an alpha channel
if image.mode == 'RGBA':
# Create a blank background image
bg = Image.new('RGB', image.size, (255, 255, 255))
# Paste image to background image
bg.paste(image, (0, 0), image)
# Save pasted image as image
bg.save(os.path.join(scriptdir, root, file), "PNG")
except:
pass
5.将数据集文件夹右键压缩,格式为zip
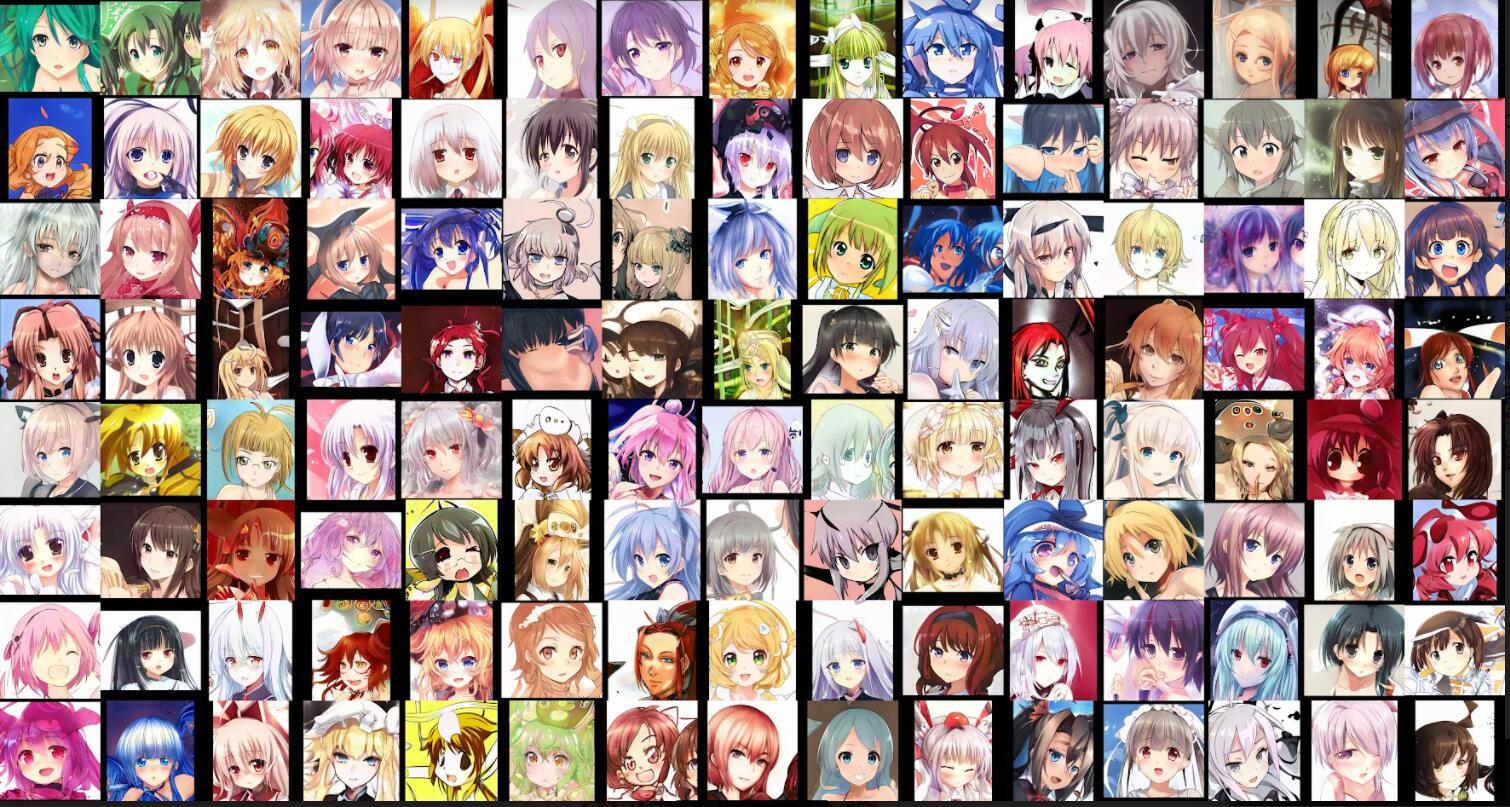
数据集制作完成,成功从1.1w张图片中提取出551张训练数据。
预训练模型:https://pan.baidu.com/s/1HVR_6D_BGXfpZbVtI3JEtg 提取码: 6b84
神秘链接:https://pan.baidu.com/s/1iAa6988n2J_dg_QwZv-xFg提取码:bk20
能完成图像爬取相信你一定能够出国学习,所以自行登陆谷歌进入谷歌云盘将下载完成的模型和自己的数据集导入谷歌云。
pbaylies修改后的stylegan2更适合在colab上进行训练,ram占用更低,训练更快,提供断点续训
stylegan2-ada是官方提供的适合小样本的架构
本次训练在google colab平台进行。
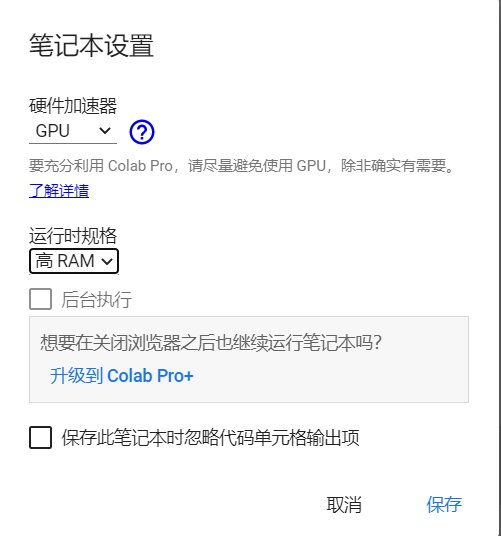
1.打开google colab,点击新建笔记本,进入页面后,点击左上角修改,笔记本设置,硬件某速器选择gpu,氪金用户运行时规格选择高ram(tpu即使是开了pro也分不到的别想了)。
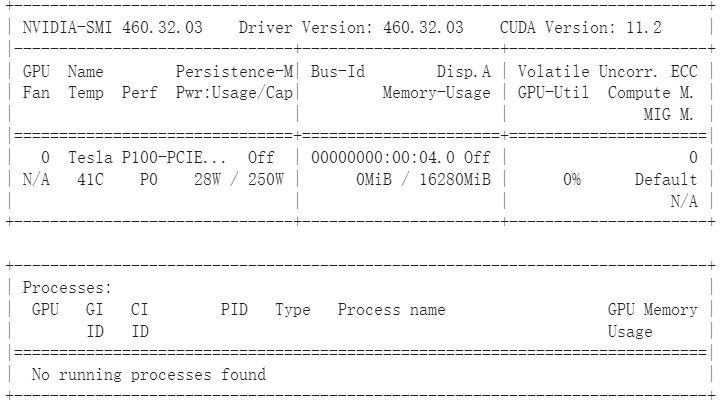
2.点击左上加+代码(+code),输入以下代码,查看自己是否分配到gpu(pro用户一般为telsa p100/t4,性能p100>t4)
gpu_info = !nvidia-smi
gpu_info = '\n'.join(gpu_info)
if gpu_info.find('failed') >= 0:
print('Not connected to a GPU')
else:
print(gpu_info)
#检测是否启用gpu以及型号
3.点击+代码,输入以下代码,检测并加载tensorflow环境
%tensorflow_version 1.x
import tensorflow as tf
print('Tensorflow version: {}'.format(tf.__version__))
#检测tf环境
4.点击+代码,输入以下代码,因为历史版本兼容问题,需要覆盖安装旧版numpy
!pip install numpy==1.19.2
5.点击左边的文件夹图标,点击上面的载入google云盘,加载自己的谷歌云盘
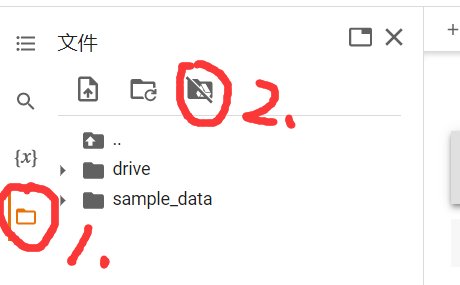
6.点击+代码,输入以下代码,改变路径至谷歌云盘
import os
os.chdir("/content/drive/My Drive")
#改变路径至谷歌云盘
7.本次选择的为pbaylies修改后的stylegan仓库,更适合在google colab训练,因为dnnlab仓库有更新,非pro用户需要下载历史版90d548243b79ab5a81292a2dfa0ab52e16c9cec。
pro用户且想使用stylegan-ada版本的请自行跳至分割栏之后,不需要下载stylegan仓库,不想使用则继续。
链接:https://pan.baidu.com/s/1aZpWk9YZbf17EfK5kQTyDw提取码:64xs
8.将历史版本传入Google云。
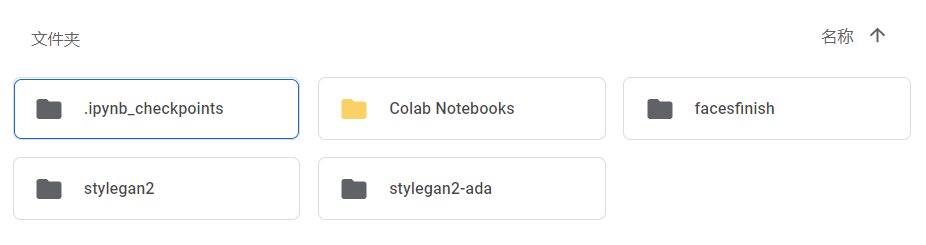
9.点击+代码,输入以下代码,解压
/content/drive/MyDrive/facesfinish.zip 为你自己的文件夹路径,-d /content/drive/MyDrive 为输出目录
在左侧自己的文件上右键点击复制路径即可粘贴
!unzip /content/drive/MyDrive/facesfinish.zip -d /content/drive/MyDrive
!unzip /content/drive/MyDrive/stylegan2-90d548243b79ab5a81292a2dfa0ab52e16c9cec.zip -d /content/drive/MyDrive
10.点击+代码,输入以下代码,制作数据集。./dataset/mage 为输出目录,/content/drive/MyDrive/facesfinish/为输入目录
os.chdir("/content/drive/My Drive/stylegan2")
!python dataset_tool.py create_from_images_raw ./dataset/mage /content/drive/MyDrive/facesfinish/
11.点击+代码,输入以下代码,因为历史版本兼容问题,需要覆盖安装旧版numpy
!pip install numpy==1.19.2
12.点击+代码,输入以下代码,开始训练
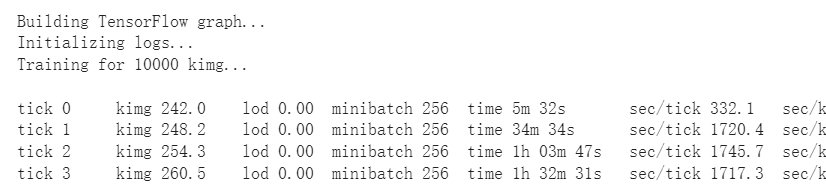
!python run_training.py --num-gpus=1 --data-dir=./dataset --config=config-f --dataset=mage \
--mirror-augment=true --metric=none --total-kimg=10000 \
--result-dir="/content/drive/My Drive/stylegan2/results" --resume-pkl=/content/drive/MyDrive/stylegan2-animeportraits.pkl
datase为你的数据集输出时的文件夹名,result-dir为输出目录,resume-pkl为迁移学习pkl路径
13.稍等几分钟,如果出现了tick0,就可以去睡觉了。
batchsize等请自行修改run_training.py,不会可以不改。lr,glr,dlr修改请输入例如--lr=0.0025

下面是pro用户使用stylegan2-ada的使用:
1.点击+代码,输入以下代码,解压
!unzip /content/drive/MyDrive/facesfinish.zip -d /content/drive/MyDrive
2.点击+代码,输入以下代码,clone stylegan2-ada仓库
!git clone https://github.com/NVlabs/stylegan2-ada/
3.点击+代码,输入以下代码,制作数据集。./dataset/mage 为输出目录,/content/drive/MyDrive/facesfinish/为输入目录
os.chdir("/content/drive/My Drive/stylegan2-ada")
!python dataset_tool.py create_from_images ./dataset/mage /content/drive/MyDrive/facesfinish/
4.点击+代码,输入以下代码,开始训练
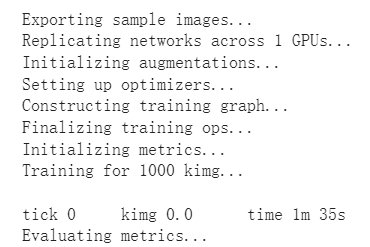
!python train.py --outdir=./training-runs --gpus=1 --snap=1 \
--data=/content/drive/MyDrive/stylegan2-ada/dataset/mage --kimg=1000 \
--resume=/content/drive/MyDrive/stylegan2-animeportraits.pkl
#开始训练,自行修改dataset,resume-pkl
5.稍等几分钟,如果出现了tick0,就可以去睡觉了。
非pro用户:生成图像
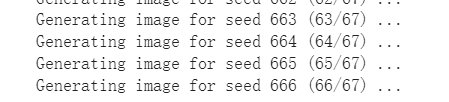
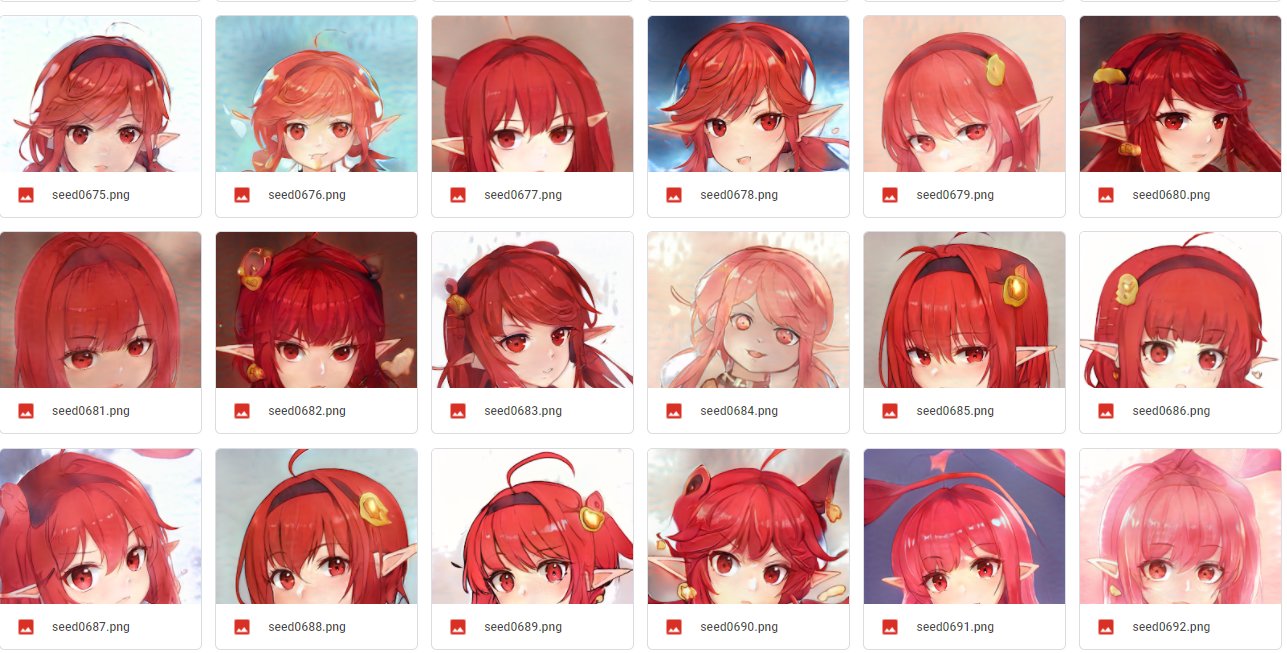
!python run_generator.py generate-images --seeds=666-777 --truncation-psi=0.5 \
--network=/content/drive/MyDrive/stylegan2/results/00301-stylegan2-mage-1gpu-config-f/network-snapshot-000272.pkl
自行将network替换为你训练好的pkl文件,修改seeds值改变生成图像,修改truncation-psi改变截断值。

stylegan2-ada用户:先克隆原始stylegan2仓库
!git clone https://github.com/NVlabs/stylegan2.git
os.chdir("/content/drive/My Drive/stylegan2")
生成图像
!python generate.py --outdir=out --trunc=0.7 --seeds=600-666 \
--network=/content/drive/MyDrive/stylegan2-ada/training-runs/00002-mage-auto1-kimg1000-resumecustom/network-snapshot-000020.pkl
自行将network替换为你训练好的pkl文件,修改seeds值改变生成图像,修改trun改变截断值。
完成后进入谷歌云盘查看生成的图像
代码自行+code
0.非stylegan2-ada用户请跳过这步,stylegan-ada不包含pretrained_networks,生成视频需要安装原始stylegan2
!git clone https://github.com/NVlabs/stylegan2.git
os.chdir("/content/drive/My Drive/stylegan2")
1.导入网络参数,自行修改pkl路径
import pretrained_networks
network_pkl = '/content/drive/MyDrive/stylegan2/results/00301-stylegan2-mage-1gpu-config-f/network-snapshot-000272.pkl'
# It returns 3 networks, we will be mainly using Gs
# _G = Instantaneous snapshot of the generator. Mainly useful for resuming a previous training run.
# _D = Instantaneous snapshot of the discriminator. Mainly useful for resuming a previous training run.
# Gs = Long-term average of the generator. Yields higher-quality results than the instantaneous snapshot.
_G, _D, Gs = pretrained_networks.load_networks(network_pkl)
2.查看是否成功导入参数,代码去掉*,不知道ev*al为啥敏感词了
Gs.vars["dlatent_avg"].value().ev*al()
3.创建一个函数,给定seeds生成潜在向量 z。
import numpy as np
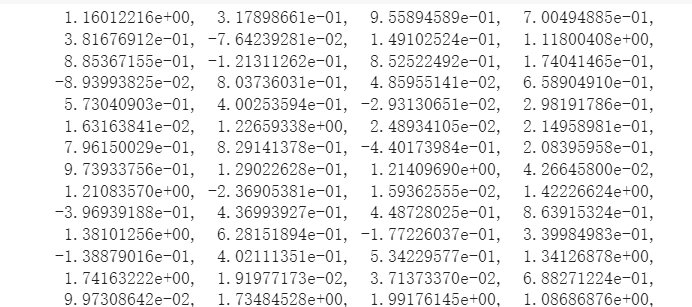
def generate_zs_from_seeds(seeds):
zs = []
for seed_idx, seed in enumerate(seeds):
rnd = np.random.RandomState(seed)
z = rnd.randn(1, *Gs.input_shape[1:]) # [minibatch, component]
zs.append(z)
return zs
4.安装tqdm库
!pip install tqdm
5.获取生成的随机向量 z 并生成图像
import dnnlib
import dnnlib.tflib as tflib
import PIL.Image
from tqdm import tqdm
noise_vars = [var for name, var in Gs.components.synthesis.vars.items() if name.startswith('noise')]
def generate_images(zs, truncation_psi):
Gs_kwargs = dnnlib.EasyDict()
Gs_kwargs.output_transform = dict(func=tflib.convert_images_to_uint8, nchw_to_nhwc=True)
Gs_kwargs.randomize_noise = False
if not isinstance(truncation_psi, list):
truncation_psi = [truncation_psi] * len(zs)
imgs = []
for z_idx, z in tqdm(enumerate(zs)):
Gs_kwargs.truncation_psi = truncation_psi[z_idx]
noise_rnd = np.random.RandomState(1) # fix noise
tflib.set_vars({var: noise_rnd.randn(*var.shape.as_list()) for var in noise_vars}) # [height, width]
images = Gs.run(z, None, **Gs_kwargs) # [minibatch, height, width, channel]
imgs.append(PIL.Image.fromarray(images[0], 'RGB'))
return imgs
def generate_images_from_seeds(seeds, truncation_psi):
return generate_images(generate_zs_from_seeds(seeds), truncation_psi)
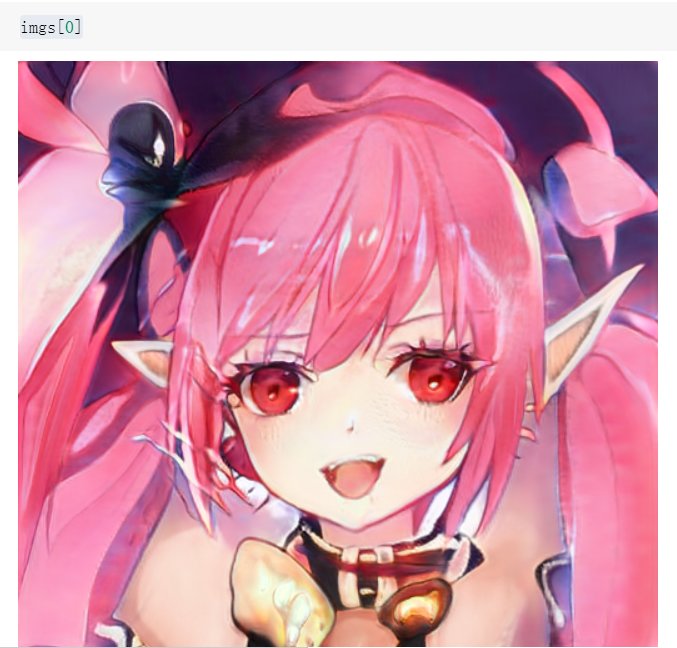
6.尝试生成9张图像
# generate some random seeds
seeds = np.random.randint(10086, size=9)
print(seeds)
zs = generate_zs_from_seeds(seeds)
imgs = generate_images(zs, .7)
7.显示1张图像
imgs[0]
8.将图像按网格排列
from math import ceil
def createImageGrid(images, scale=0.25, rows=1):
w,h = images[0].size
w = int(w*scale)
h = int(h*scale)
height = rows*h
cols = ceil(len(images) / rows)
width = cols*w
canvas = PIL.Image.new('RGBA', (width,height), 'white')
for i,img in enumerate(images):
img = img.resize((w,h), PIL.Image.ANTIALIAS)
canvas.paste(img, (w*(i % cols), h*(i // cols)))
return canvas
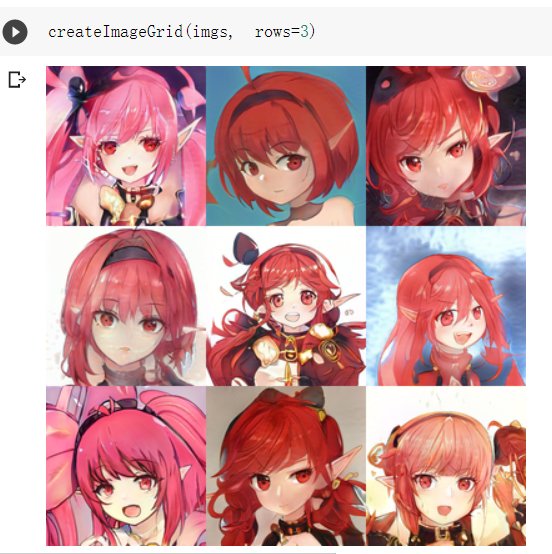
9.显示3*3图像
createImageGrid(imgs, rows=3)
10.在 z 向量的两个值之间进行插值
def interpolate(zs, steps):
out = []
for i in range(len(zs)-1):
for index in range(steps):
fraction = index/float(steps)
out.append(zs[i+1]*fraction + zs*(1-fraction))
return out
11.查看插值结果
seeds = np.random.randint(10000000, size=2)
zs = generate_zs_from_seeds(seeds)
imgs = generate_images(interpolate(zs, 7), 0.5)
createImageGrid(imgs, rows=1)

12.制作插值动画
grid_size = [h,w] w行h列,[1,1]单个图像
duration_sec = 5 时长,秒
smoothing_sec = 1.0 过度时长,秒
fps = 15
bitrate = '2M' #4M 比特率
random_seed = np.random.randint(0, 999)#随机数种子,可以输入固定值
filename = '/content/drive/MyDrive/random_grid_%s.gif' % random_seed 修改为自己的目录
import scipy
grid_size = [3, 3]
image_shrink = 1
image_zoom = 1
duration_sec = 5
smoothing_sec = 1.0
fps = 15
codec = 'libx264'
bitrate = '2M'#4M
random_seed = np.random.randint(0, 999)#405
filename = '/content/drive/MyDrive/random_grid_%s.gif' % random_seed
truncation_psi= 0.7
num_frames = int(np.rint(duration_sec * fps))
random_state = np.random.RandomState(random_seed)
# Generate latent vectors
shape = [num_frames, np.prod(grid_size)] + Gs.input_shape[1:] # [frame, image, channel, component]
all_latents = random_state.randn(*shape).astype(np.float32)
all_latents = scipy.ndimage.gaussian_filter(all_latents, [smoothing_sec * fps] + [0] * len(Gs.input_shape), mode='wrap')
all_latents /= np.sqrt(np.mean(np.square(all_latents)))
def create_image_grid(images, grid_size=None):
assert images.ndim == 3 or images.ndim == 4
num, img_h, img_w, channels = images.shape
if grid_size is not None:
grid_w, grid_h = tuple(grid_size)
else:
grid_w = max(int(np.ceil(np.sqrt(num))), 1)
grid_h = max((num - 1) // grid_w + 1, 1)
grid = np.zeros([grid_h * img_h, grid_w * img_w, channels], dtype=images.dtype)
for idx in range(num):
x = (idx % grid_w) * img_w
y = (idx // grid_w) * img_h
grid[y : y + img_h, x : x + img_w] = images[idx]
return grid
# Frame generation func for moviepy.
def make_frame(t):
frame_idx = int(np.clip(np.round(t * fps), 0, num_frames - 1))
latents = all_latents[frame_idx]
fmt = dict(func=tflib.convert_images_to_uint8, nchw_to_nhwc=True)
images = Gs.run(latents, None, truncation_psi=truncation_psi,
randomize_noise=False, output_transform=fmt,
minibatch_size=16)
grid = create_image_grid(images, grid_size)
if image_zoom > 1:
grid = scipy.ndimage.zoom(grid, [image_zoom, image_zoom, 1], order=0)
if grid.shape[2] == 1:
grid = grid.repeat(3, 2) # grayscale => RGB
return grid
# Generate video.
import moviepy.editor
video_clip = moviepy.editor.VideoClip(make_frame, duration=duration_sec)
# Use this if you want to generate .mp4 video instead
# video_clip.write_videofile("interpolate3x2-2m.mp4", fps=fps, codec=codec, bitrate=bitrate)
video_clip.write_gif(filename,fps=15)
13.准备生成文件
# Generate video.
import moviepy.editor
video_clip = moviepy.editor.VideoClip(make_frame, duration=duration_sec)
13.生成gif动画
video_clip.write_gif(filename,fps=15)
14.生成视频
video_clip.write_videofile('/content/drive/MyDrive/random_grid_%s.mp4' % random_seed,fps = 30)
15.恭喜你,将生成的gif和mp4从谷歌云盘上下载下来,上传到b站保存并转发给亲朋好友装x吧。
alpha通道去除:remove-transparency
google colab:https://colab.research.google.com/
参考资料:
https://blog.csdn.net/DLW__/article/details/104243506
https://towardsdatascience.com/g ... legan2-6f8ae59e237b
数据集:
链接:https://pan.baidu.com/s/1pUSTsqSz-EpFvM5TYDYz7A提取码:zve2 密码我的id |
|
|
评分
-
查看全部评分
|
 [复制链接]
 36 点可用积分
 闽公网安备35010302000392号 闽ICP备06029681号-4 )